Rotating Guest Password of an Omada Controller's SSID With a Script
- Jorge Morán
- Homelab
- June 2, 2024
- 6 min
I used to have a captive portal in my house for guests, but it was tedious to hand out individual passwords, and keeping track of the newly generated passwords was not the best experience management-wise.
I decided the easiest approach would be to get rid of the captive portal and use a rotating password for an isolated SSID. In my house, I have TP-Link APs. Both of them are EAP660 HD(US) v1.0. I’m happy with them because I haven’t had any issues.
To manage both devices, I run the Omada Controller software via a container . In general, the software is good, and it even supports programmatic access via OAuth 2.0. I tried to use the client credentials grant to authenticate and automate the process, but the documentation of the endpoint is not as good as I’d like.
However, I found that the author of the Omada Controller container created base scripts for Bash and PowerShell to authenticate.
Warning
The script needs to be adjusted, particularly the last request, which modifies the SSID. The script is configured to use WPA2 and my SSID’s configuration, which might not be everyone’s need. Ideally, you should extract a request on your instance from your browser’s Developer Tools and check the parameters there.
The script authenticates to the server and sends a request with the exact previous parameters of my SSID, but it modifies the password.
 1### Bash Example
 2# Set variables
 3# This script assumes that the SSID already exists, it just modifies it.
 4OMADA_URL=""
 5USERNAME=""
 6PASSWORD=""
 7SITE_ID=""
 8WLAN_ID=""
 9SSID_ID=""
10SSID=""
11SECURITY_KEY="new_password"
12RATE_LIMIT_ID=""
13
14# get controller id from the API
15CONTROLLER_ID="$(curl -sk "${OMADA_URL}/api/info" | jq -r .result.omadacId)"
16
17# login, get token, set & use cookies
18TOKEN="$(curl -sk -X POST -c "/tmp/omada-cookies.txt" -b "/tmp/omada-cookies.txt" -H "Content-Type: application/json" "${OMADA_URL}/${CONTROLLER_ID}/api/v2/login" -d '{"username": "'"${USERNAME}"'", "password": "'"${PASSWORD}"'"}' | jq -r .result.token)"
19
20# once logged in, make sure you add the following header on additional API calls:
21# -H "Csrf-Token: ${TOKEN}"
22
23# validate login
24curl -sk -X GET -b "/tmp/omada-cookies.txt" -H "Content-Type: application/json" -H "Csrf-Token: ${TOKEN}" "${OMADA_URL}/${CONTROLLER_ID}/api/v2/loginStatus?token=${TOKEN}" | jq .
25
26curl --insecure "${OMADA_URL}/${CONTROLLER_ID}/api/v2/sites/${SITE_ID}/setting/wlans/${WLAN_ID}/ssids/${SSID_ID}" \
27-X PATCH -b "/tmp/omada-cookies.txt" -H 'User-Agent: Mozilla/5.0 (Macintosh; Intel Mac OS X 10.15; rv:125.0) Gecko/20100101 Firefox/125.0' \
28-H 'Accept: application/json, text/plain, */*' -H 'Accept-Language: en-US,en;q=0.5'  \
29-H 'Accept-Encoding: gzip, deflate, br' \
30-H 'Content-Type: application/json;charset=utf-8' -H 'X-Requested-With: XMLHttpRequest' \
31-H "Csrf-Token: ${TOKEN}" -H "Origin: ${OMADA_URL}" -H 'DNT: 1' \
32-H 'Connection: keep-alive' \
33-H 'Sec-Fetch-Dest: empty' -H 'Sec-Fetch-Mode: cors' -H 'Sec-Fetch-Site: same-origin' \
34-H 'Sec-GPC: 1' \
35--data-raw "{
36  \"name\": \"${SSID}\",
37  \"band\": 3,
38  \"guestNetEnable\": false,
39  \"security\": 3,
40  \"broadcast\": true,
41  \"vlanEnable\": true,
42  \"vlanId\": 60,
43  \"pskSetting\": {
44    \"securityKey\": \"${SECURITY_KEY}\",
45    \"encryptionPsk\": 3,
46    \"versionPsk\": 2,
47    \"gikRekeyPskEnable\": false
48  },
49  \"rateLimit\": {
50    \"rateLimitId\": \"${RATE_LIMIT_ID}\"
51  },
52  \"ssidRateLimit\": {
53    \"rateLimitId\": \"${RATE_LIMIT_ID}\"
54  },
55  \"wlanScheduleEnable\": false,
56  \"rateAndBeaconCtrl\": {
57    \"rate2gCtrlEnable\": false,
58    \"rate5gCtrlEnable\": false,
59    \"rate6gCtrlEnable\": false
60  },
61  \"macFilterEnable\": false,
62  \"wlanId\": \"\",
63  \"enable11r\": false,
64  \"pmfMode\": 3,
65  \"multiCastSetting\": {
66    \"multiCastEnable\": true,
67    \"arpCastEnable\": false,
68    \"filterEnable\": false,
69    \"ipv6CastEnable\": true,
70    \"channelUtil\": 100
71  },
72  \"mloEnable\": false
73}"
As we notice, starting from line 4, we need to define some parameters.
- OMADA_URL, username and password are related to the path and credentials of each instance. They should be straightforward to set.
- Site ID is a number that identifies each “site”. In the context of an Omada Controller, they have a default site. In most cases, that’s the one we need.
- WLAN ID is the identifier of our WLAN, not to be confused with the ID of our SSID. They are different things.
- SSID ID is the ID of the SSID.
- SSID is the name of our SSID.
- Security Key is the new password we want to set, we can get creative with this one, as we could randomly generate it instead of setting it. So that during each execution we could set the value. However, if we do this, we also need to modify the script to send us the new password.
- Rate Limit ID This parameter is required by the SSID configuration, there’s always a default rate limit.
Let’s analyze how to obtain most of these parameters. Particularly, the IDs. To do this, we’ll need to navigate through the pages of the Omada Controller with the browser’s Developer Tools open in the Network section.
After authenticating to the controller, we’ll need to find the section to select the default site. And click it to be in the context of our main site.
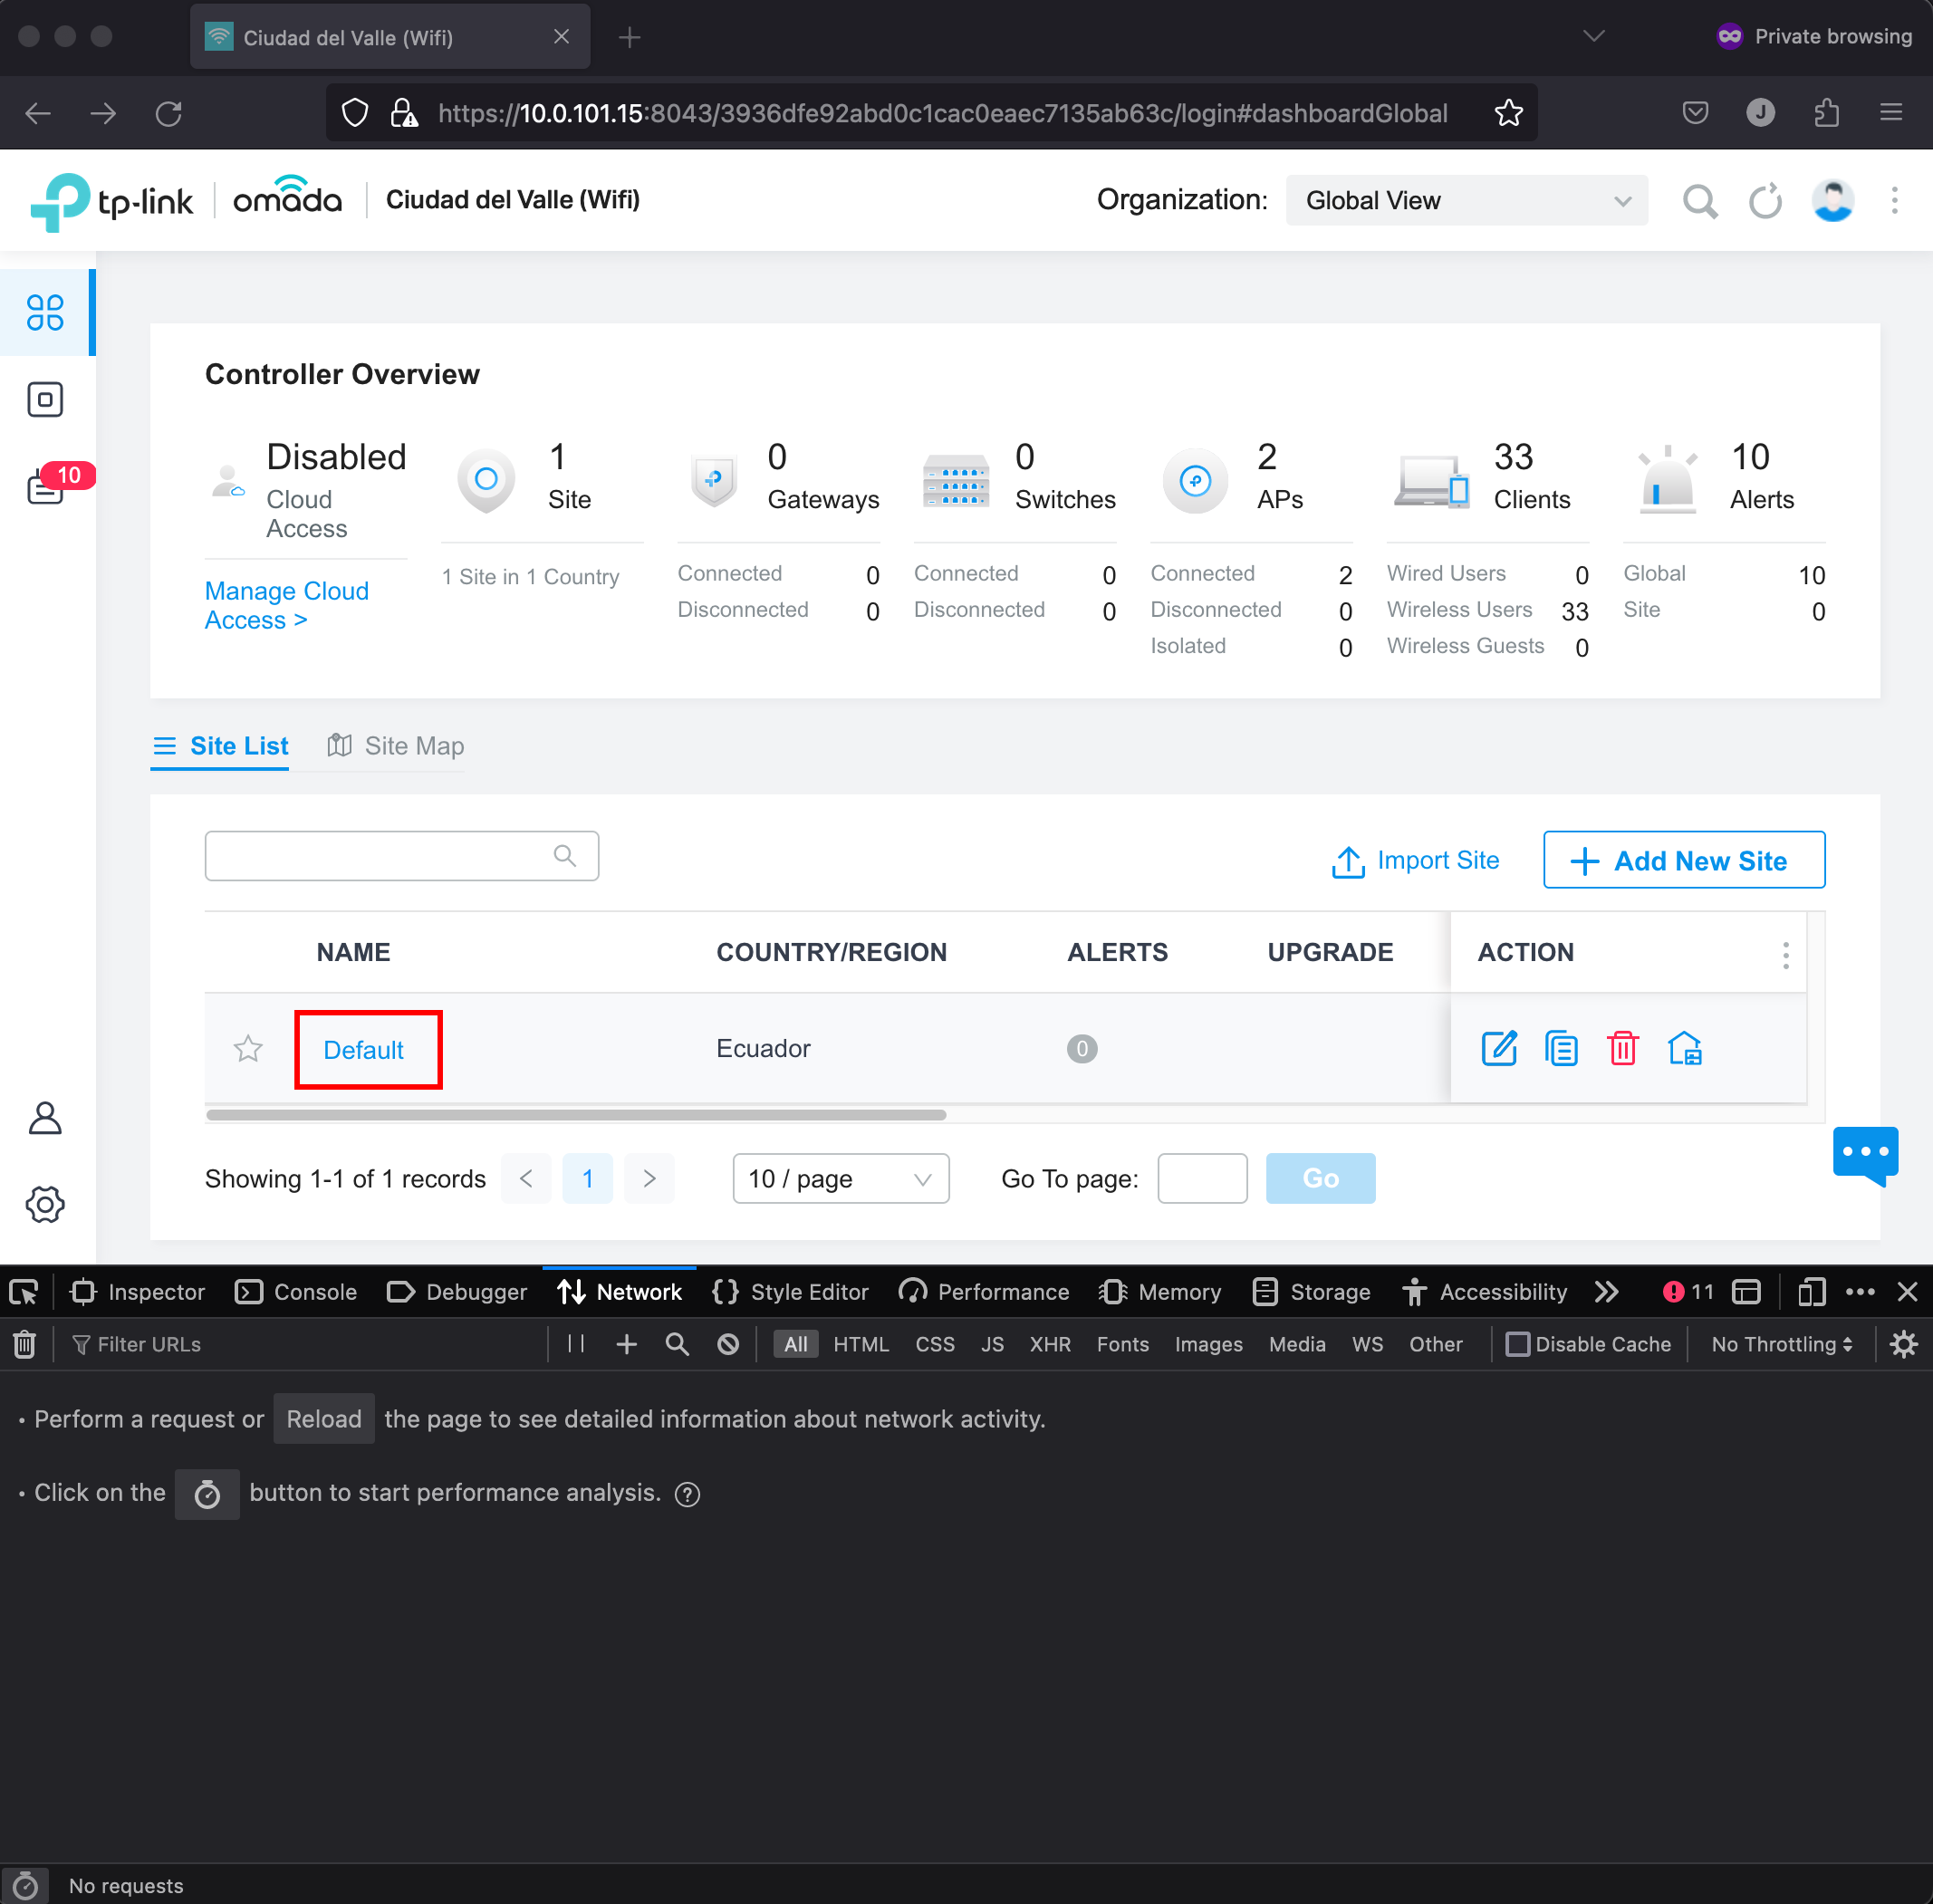
When we select the default site, the menu on the right will have a gear icon, that upon clicking it, will show us the Site Settings. In there, we’ll click on Wireless Networks > WLAN. That option will list our SSIDs. When we open that page, we can search for wlans in the network requests. That will let us find the request whose response contains the Site ID and WLAN ID.
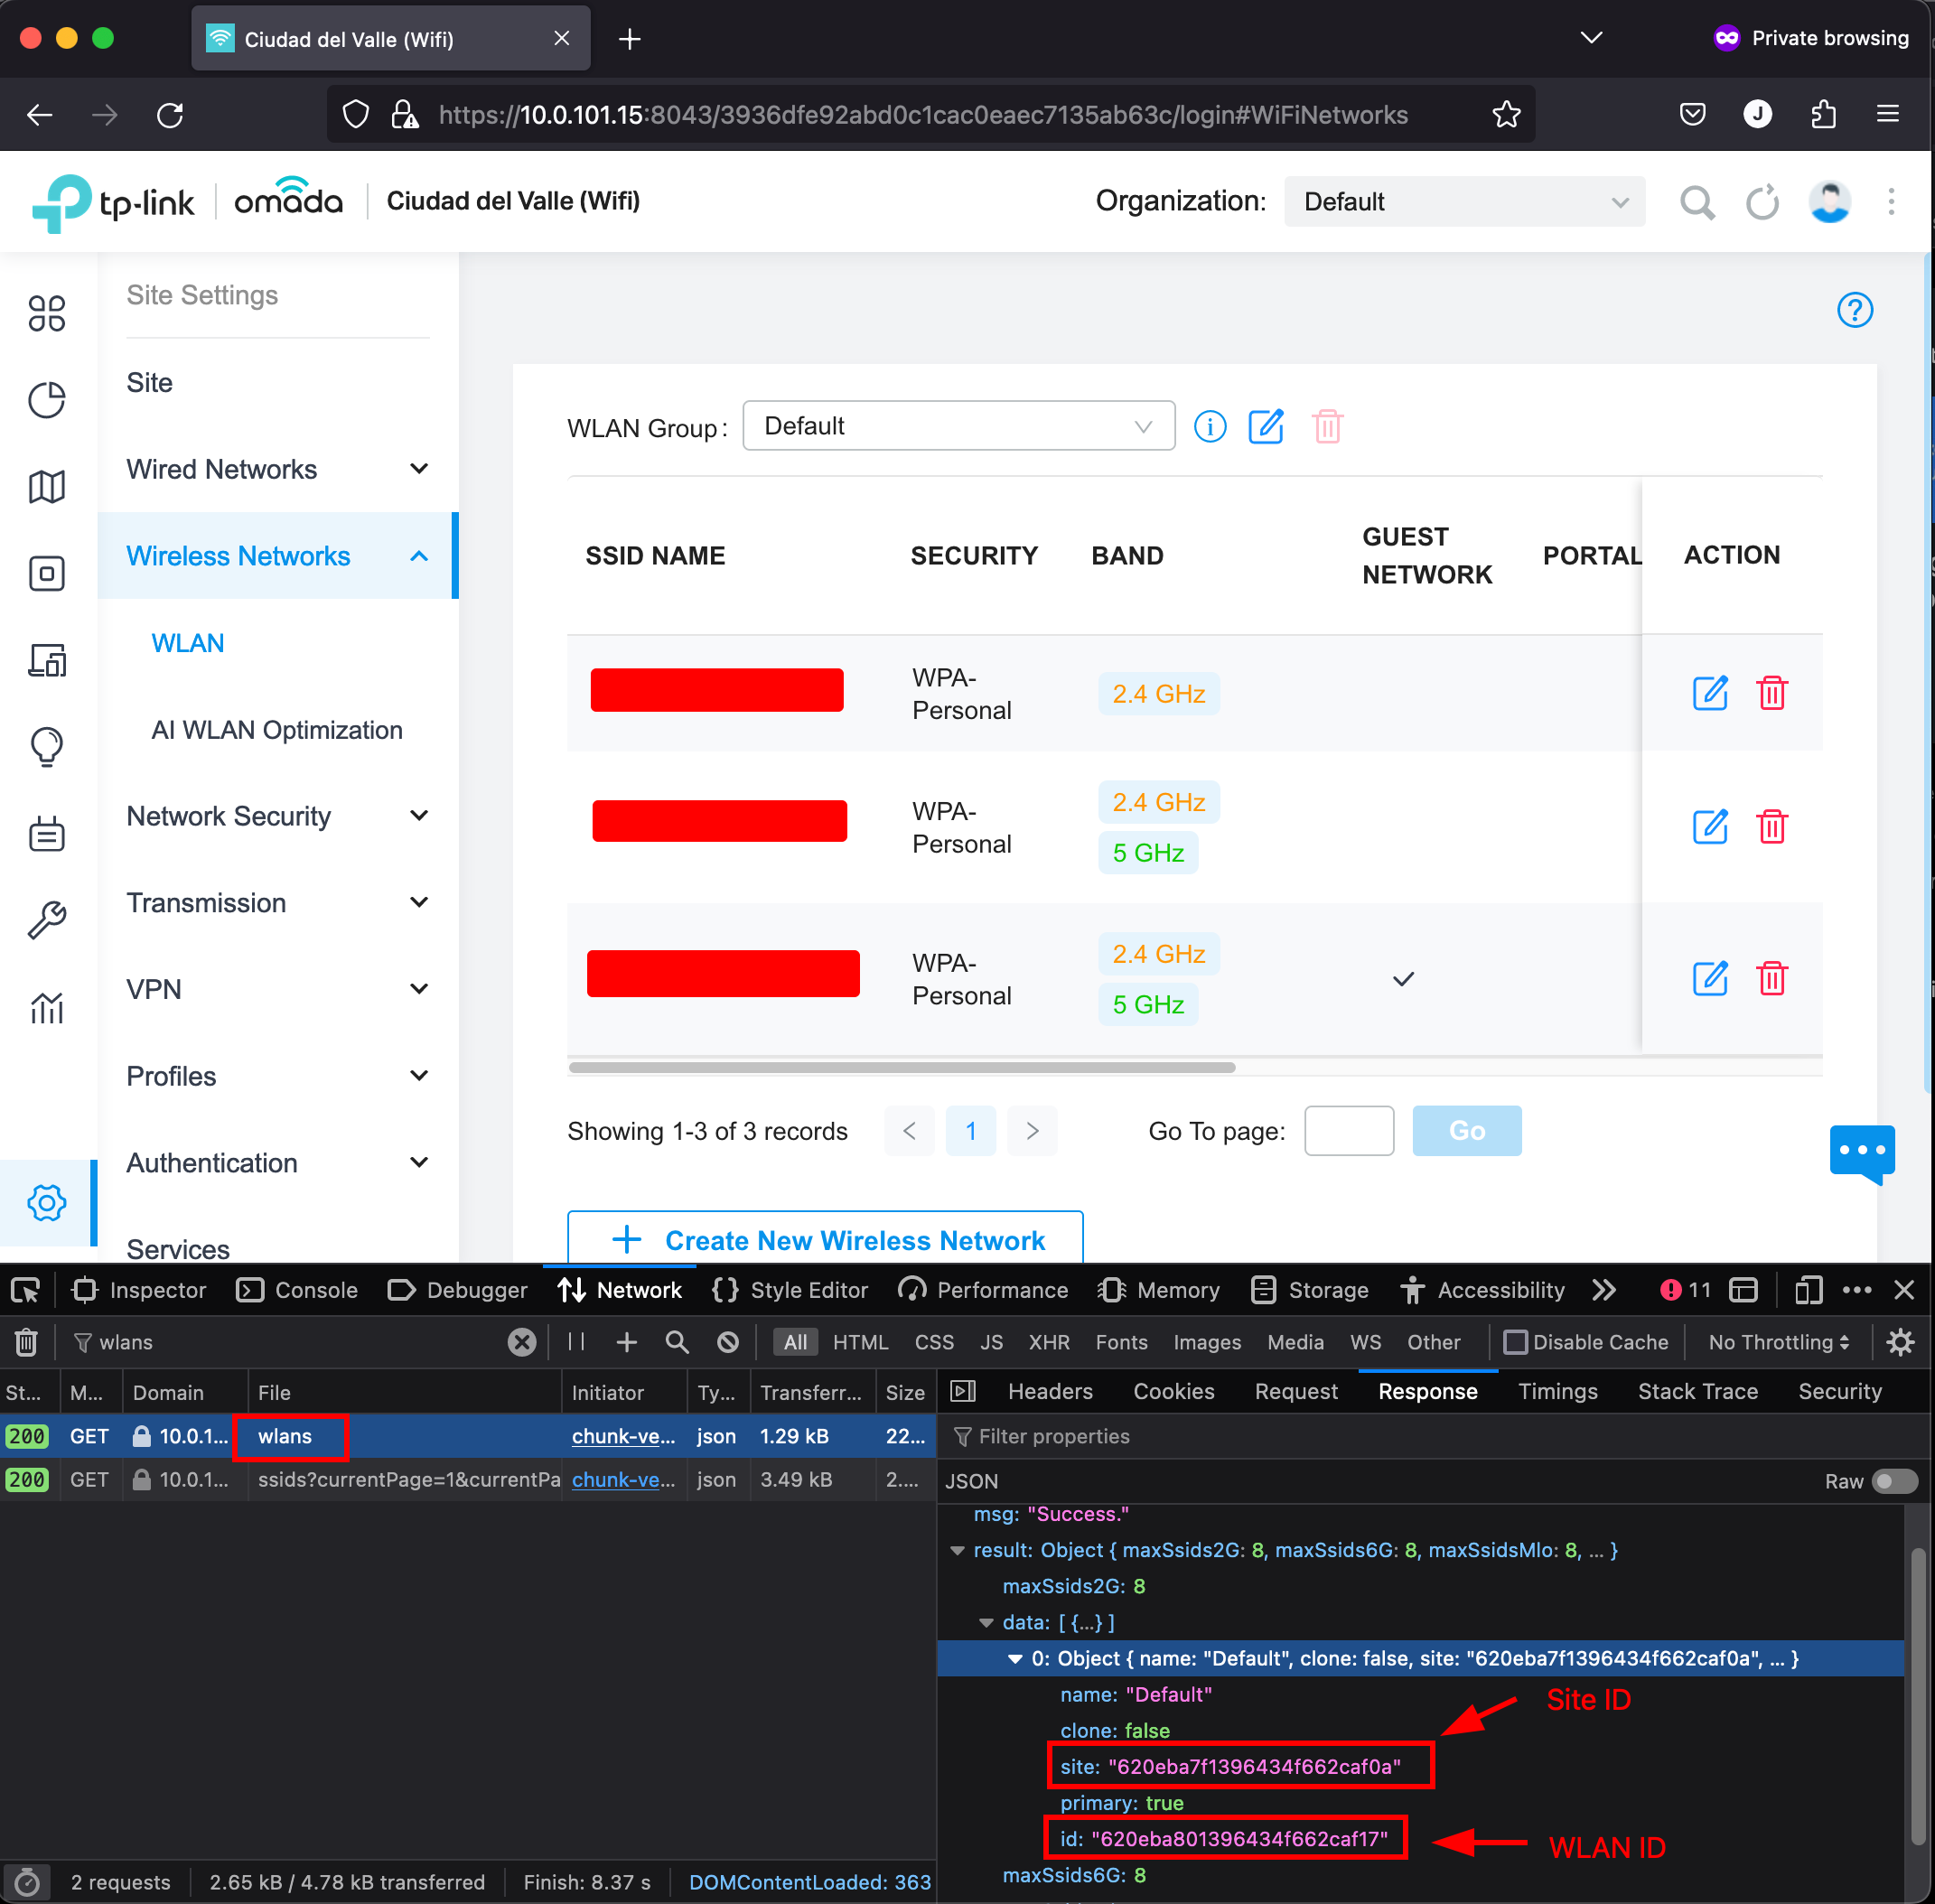
Perfect, now let’s obtain the Rate Limit ID. To do that, in the Site Settings menu, we need to open the Profiles submenu and select Rate Limits. After opening it, we need to search for rateLimits in the Developer Tools and we’ll find the value.
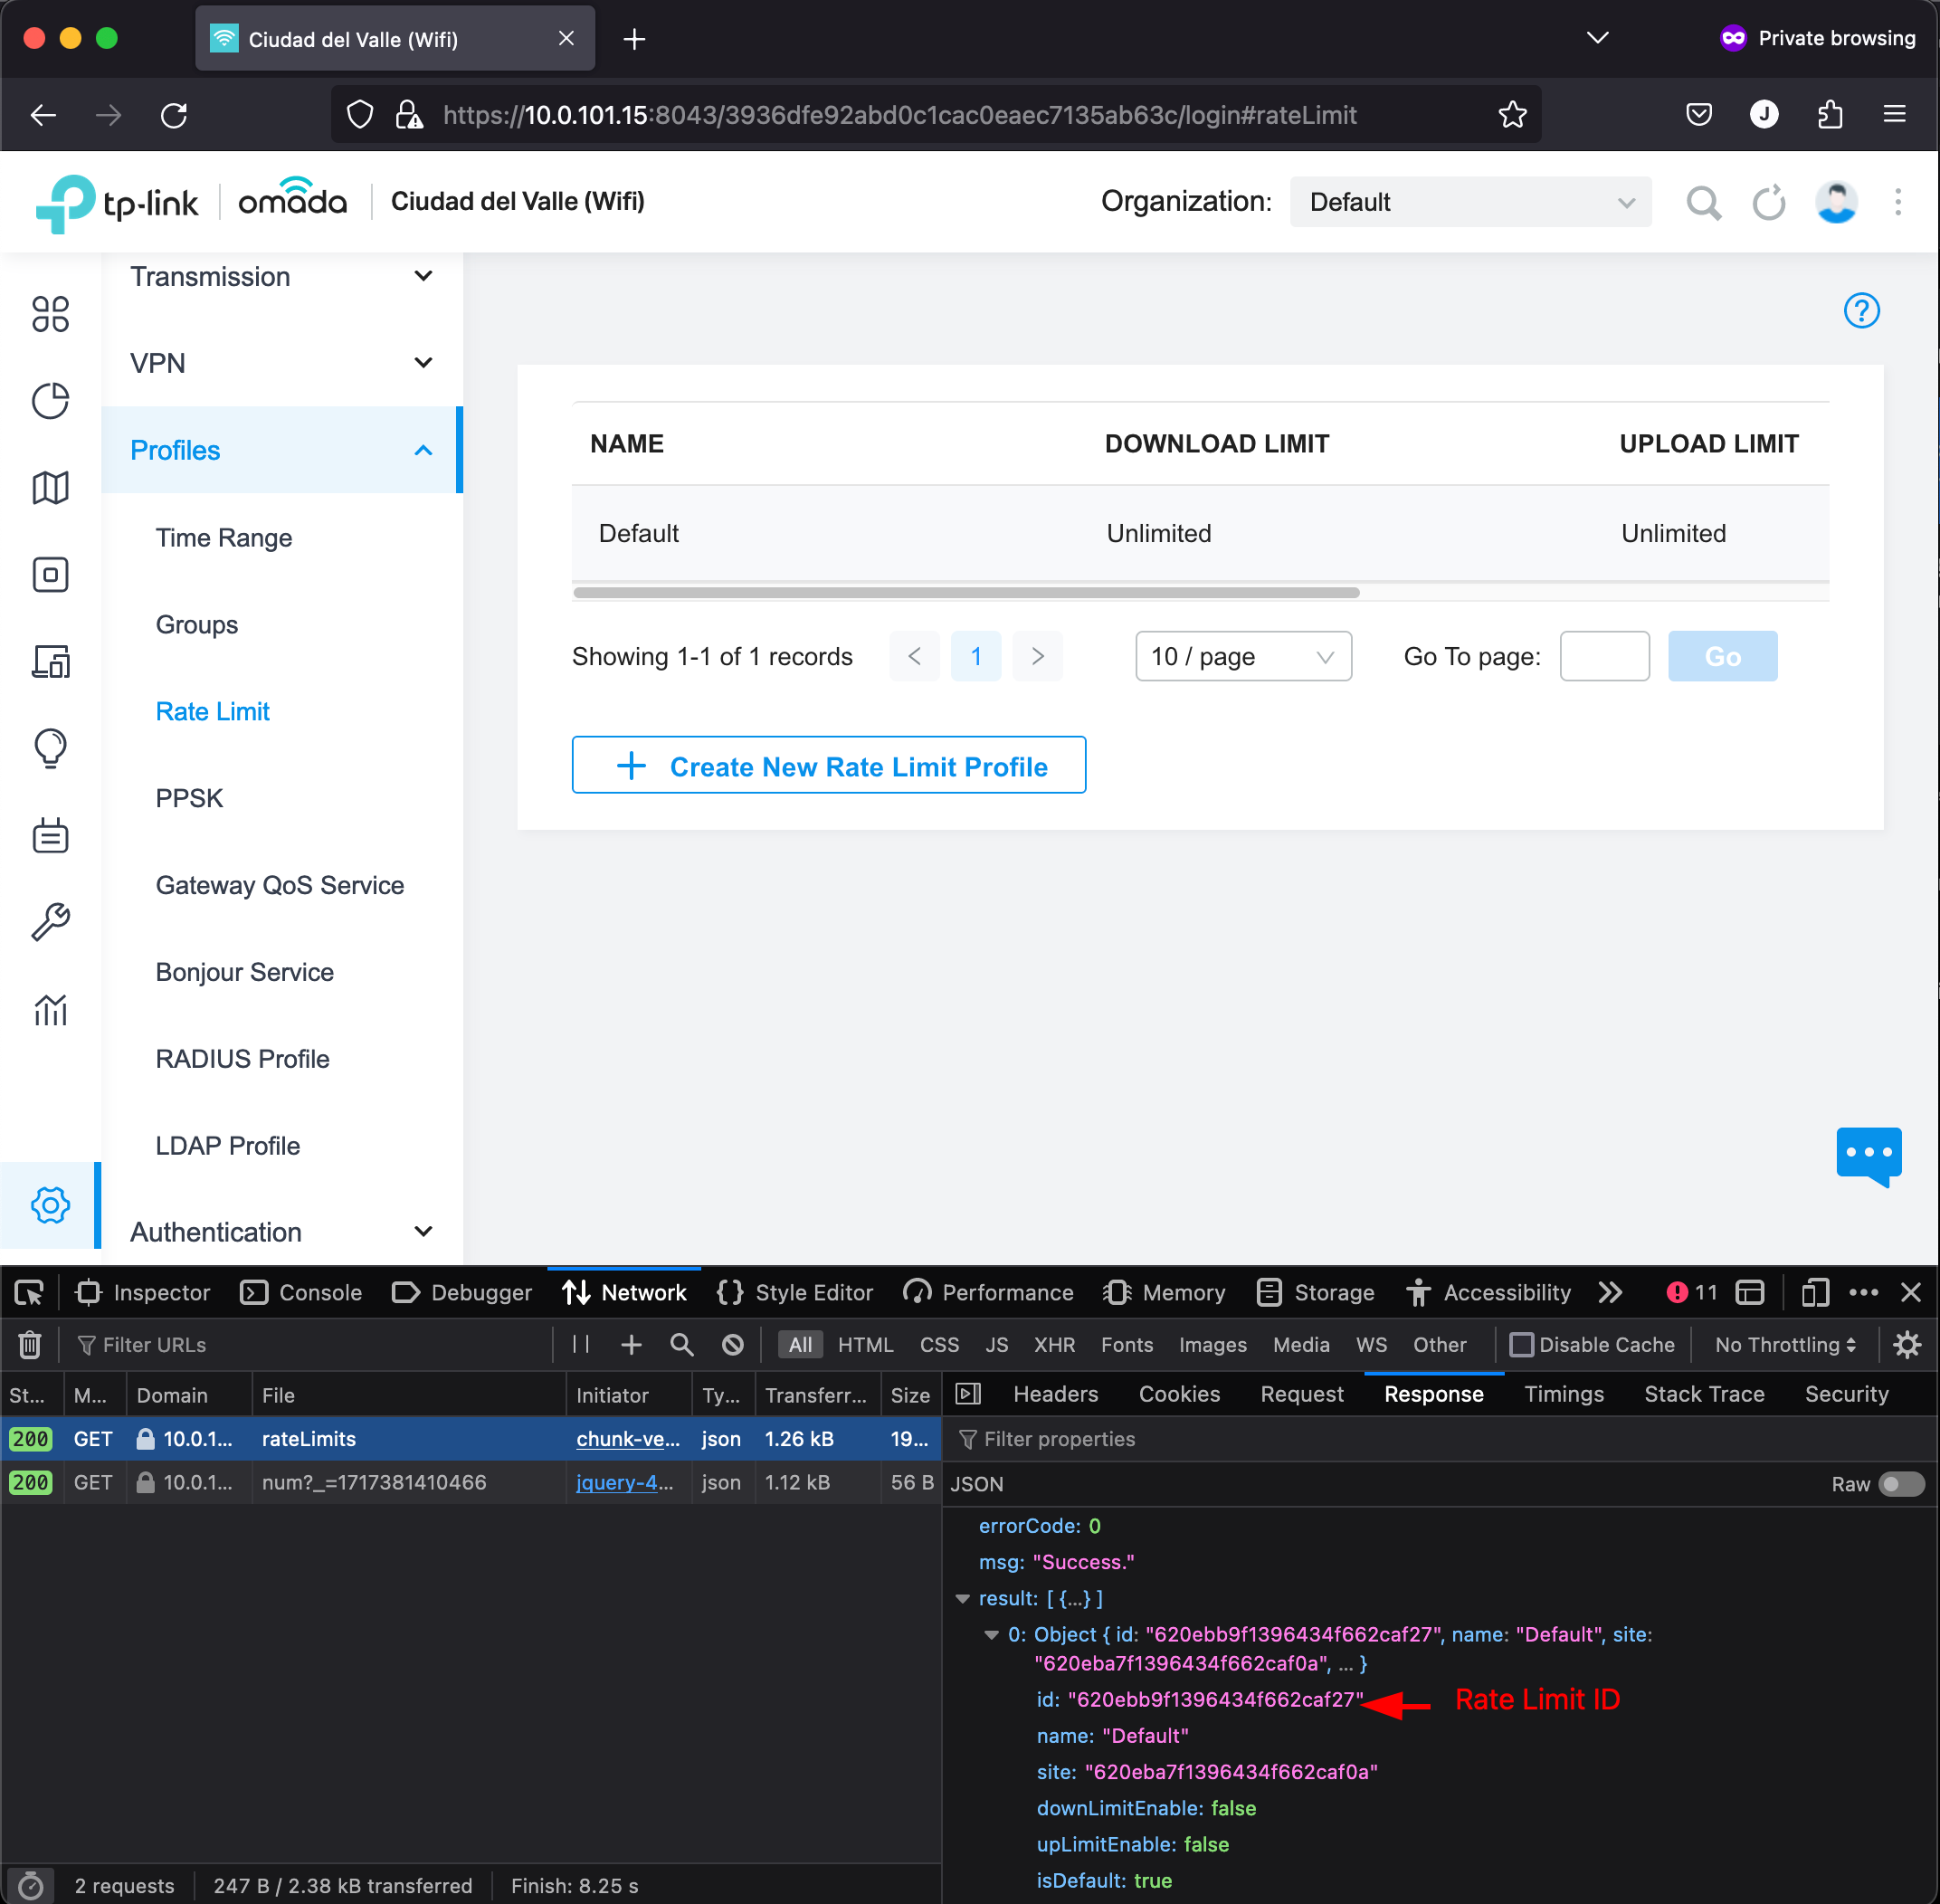
Now, we only need the SSID and the SSID name. For this example, I’ve created a new SSID called TEST_ID. For reference, below we have the payload that I used to define this new SSID.
{"name":"TEST_SSID","band":3,"guestNetEnable":true,"security":3,"broadcast":true,"vlanEnable":false,"pskSetting":{"securityKey":"superlongpassword1.","encryptionPsk":3,"versionPsk":2,"gikRekeyPskEnable":false},"rateLimit":{"rateLimitId":"620ebb9f1396434f662caf27"},"ssidRateLimit":{"rateLimitId":"620ebb9f1396434f662caf27"},"wlanScheduleEnable":false,"rateAndBeaconCtrl":{"rate2gCtrlEnable":false,"rate5gCtrlEnable":false,"rate6gCtrlEnable":false},"macFilterEnable":false,"wlanId":"","enable11r":false,"pmfMode":3,"multiCastSetting":{"multiCastEnable":true,"arpCastEnable":false,"filterEnable":false,"ipv6CastEnable":true,"channelUtil":100},"mloEnable":false}
We can proceed to go back to the list of SSIDs and in the network tab of the Developer Tools, we can search for ssids?currentPage. In the response we have all the SSIDs we have created. In this case, we have the TEST_SSID and its ID.
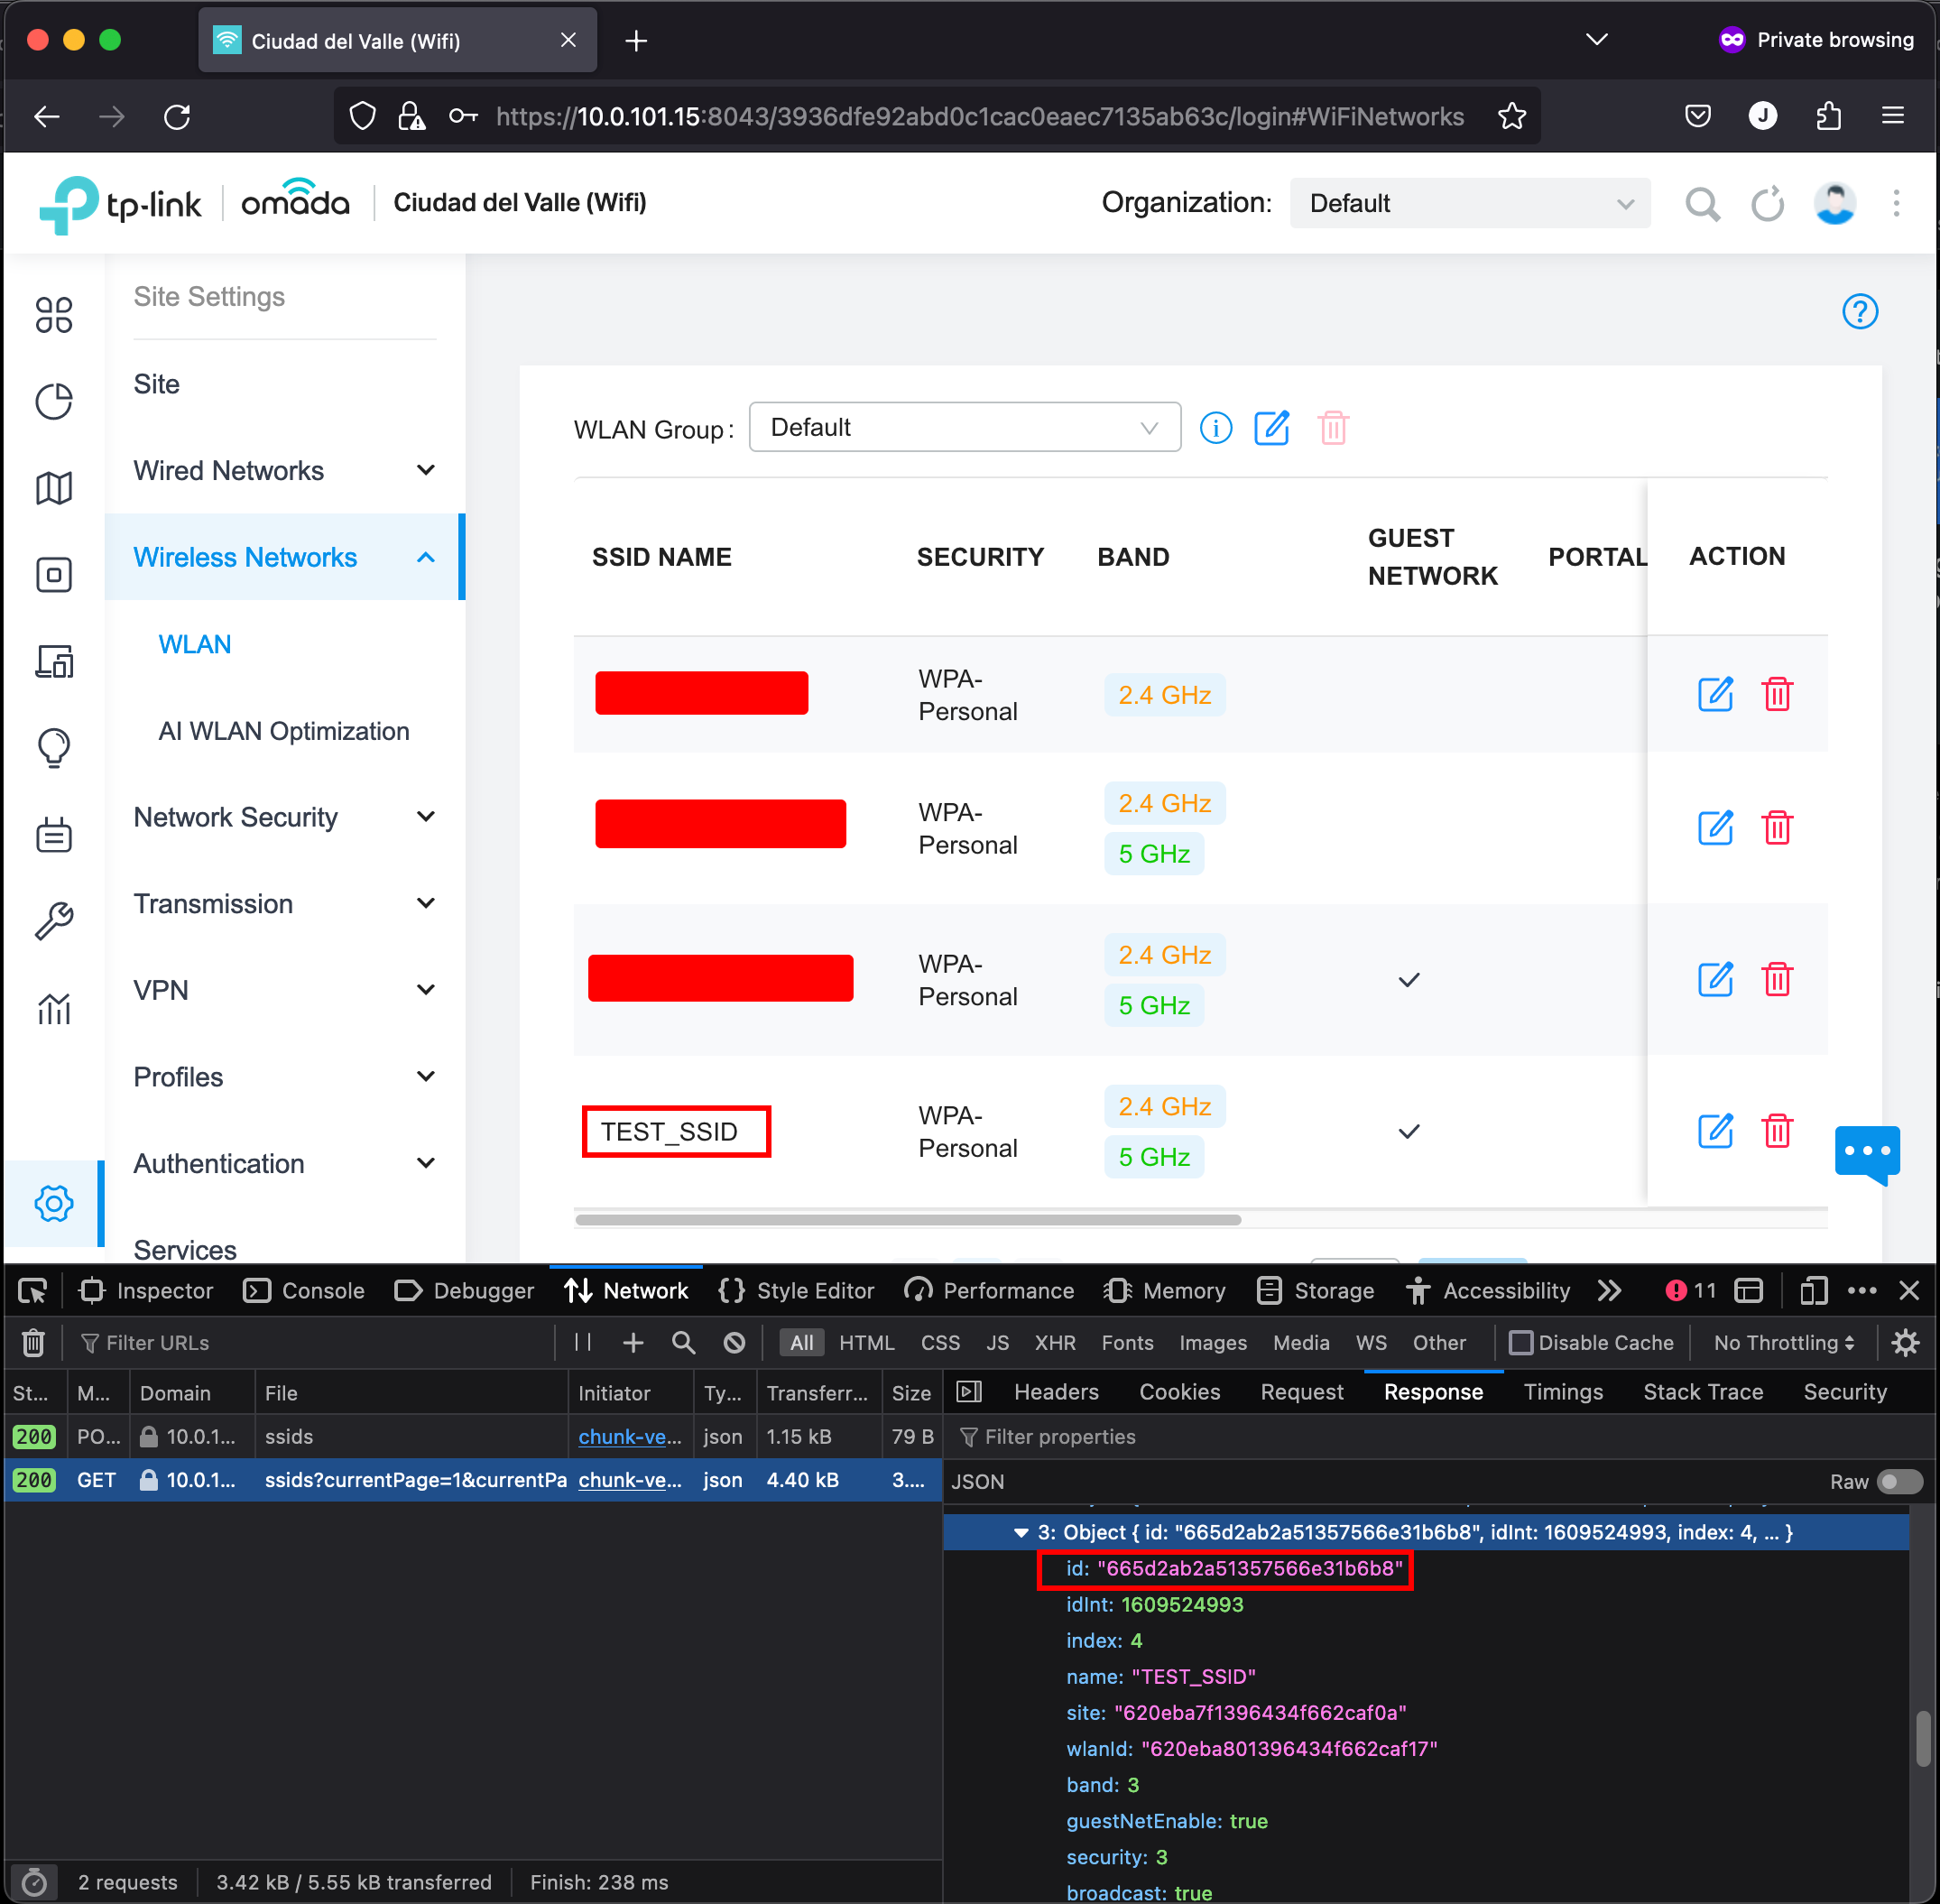
So far, we have all the values we need:
SITE_ID="620eba7f1396434f662caf0a"
WLAN_ID="620eba801396434f662caf17"
SSID_ID="665d2ab2a51357566e31b6b8"
SSID="TEST_SSID"
SECURITY_KEY="newsecurepassword"
RATE_LIMIT_ID="620ebb9f1396434f662caf27"
By this point, we are ready to run the script.
❯ ./omada_password.sh
{
  "errorCode": 0,
  "msg": "Success.",
  "result": {
    "login": true
  }
}
{"errorCode":0,"msg":"Success."}%
After executing the script, it seems everything went OK. To verify this, we can check the settings of our SSID and inspect if it has the new password.
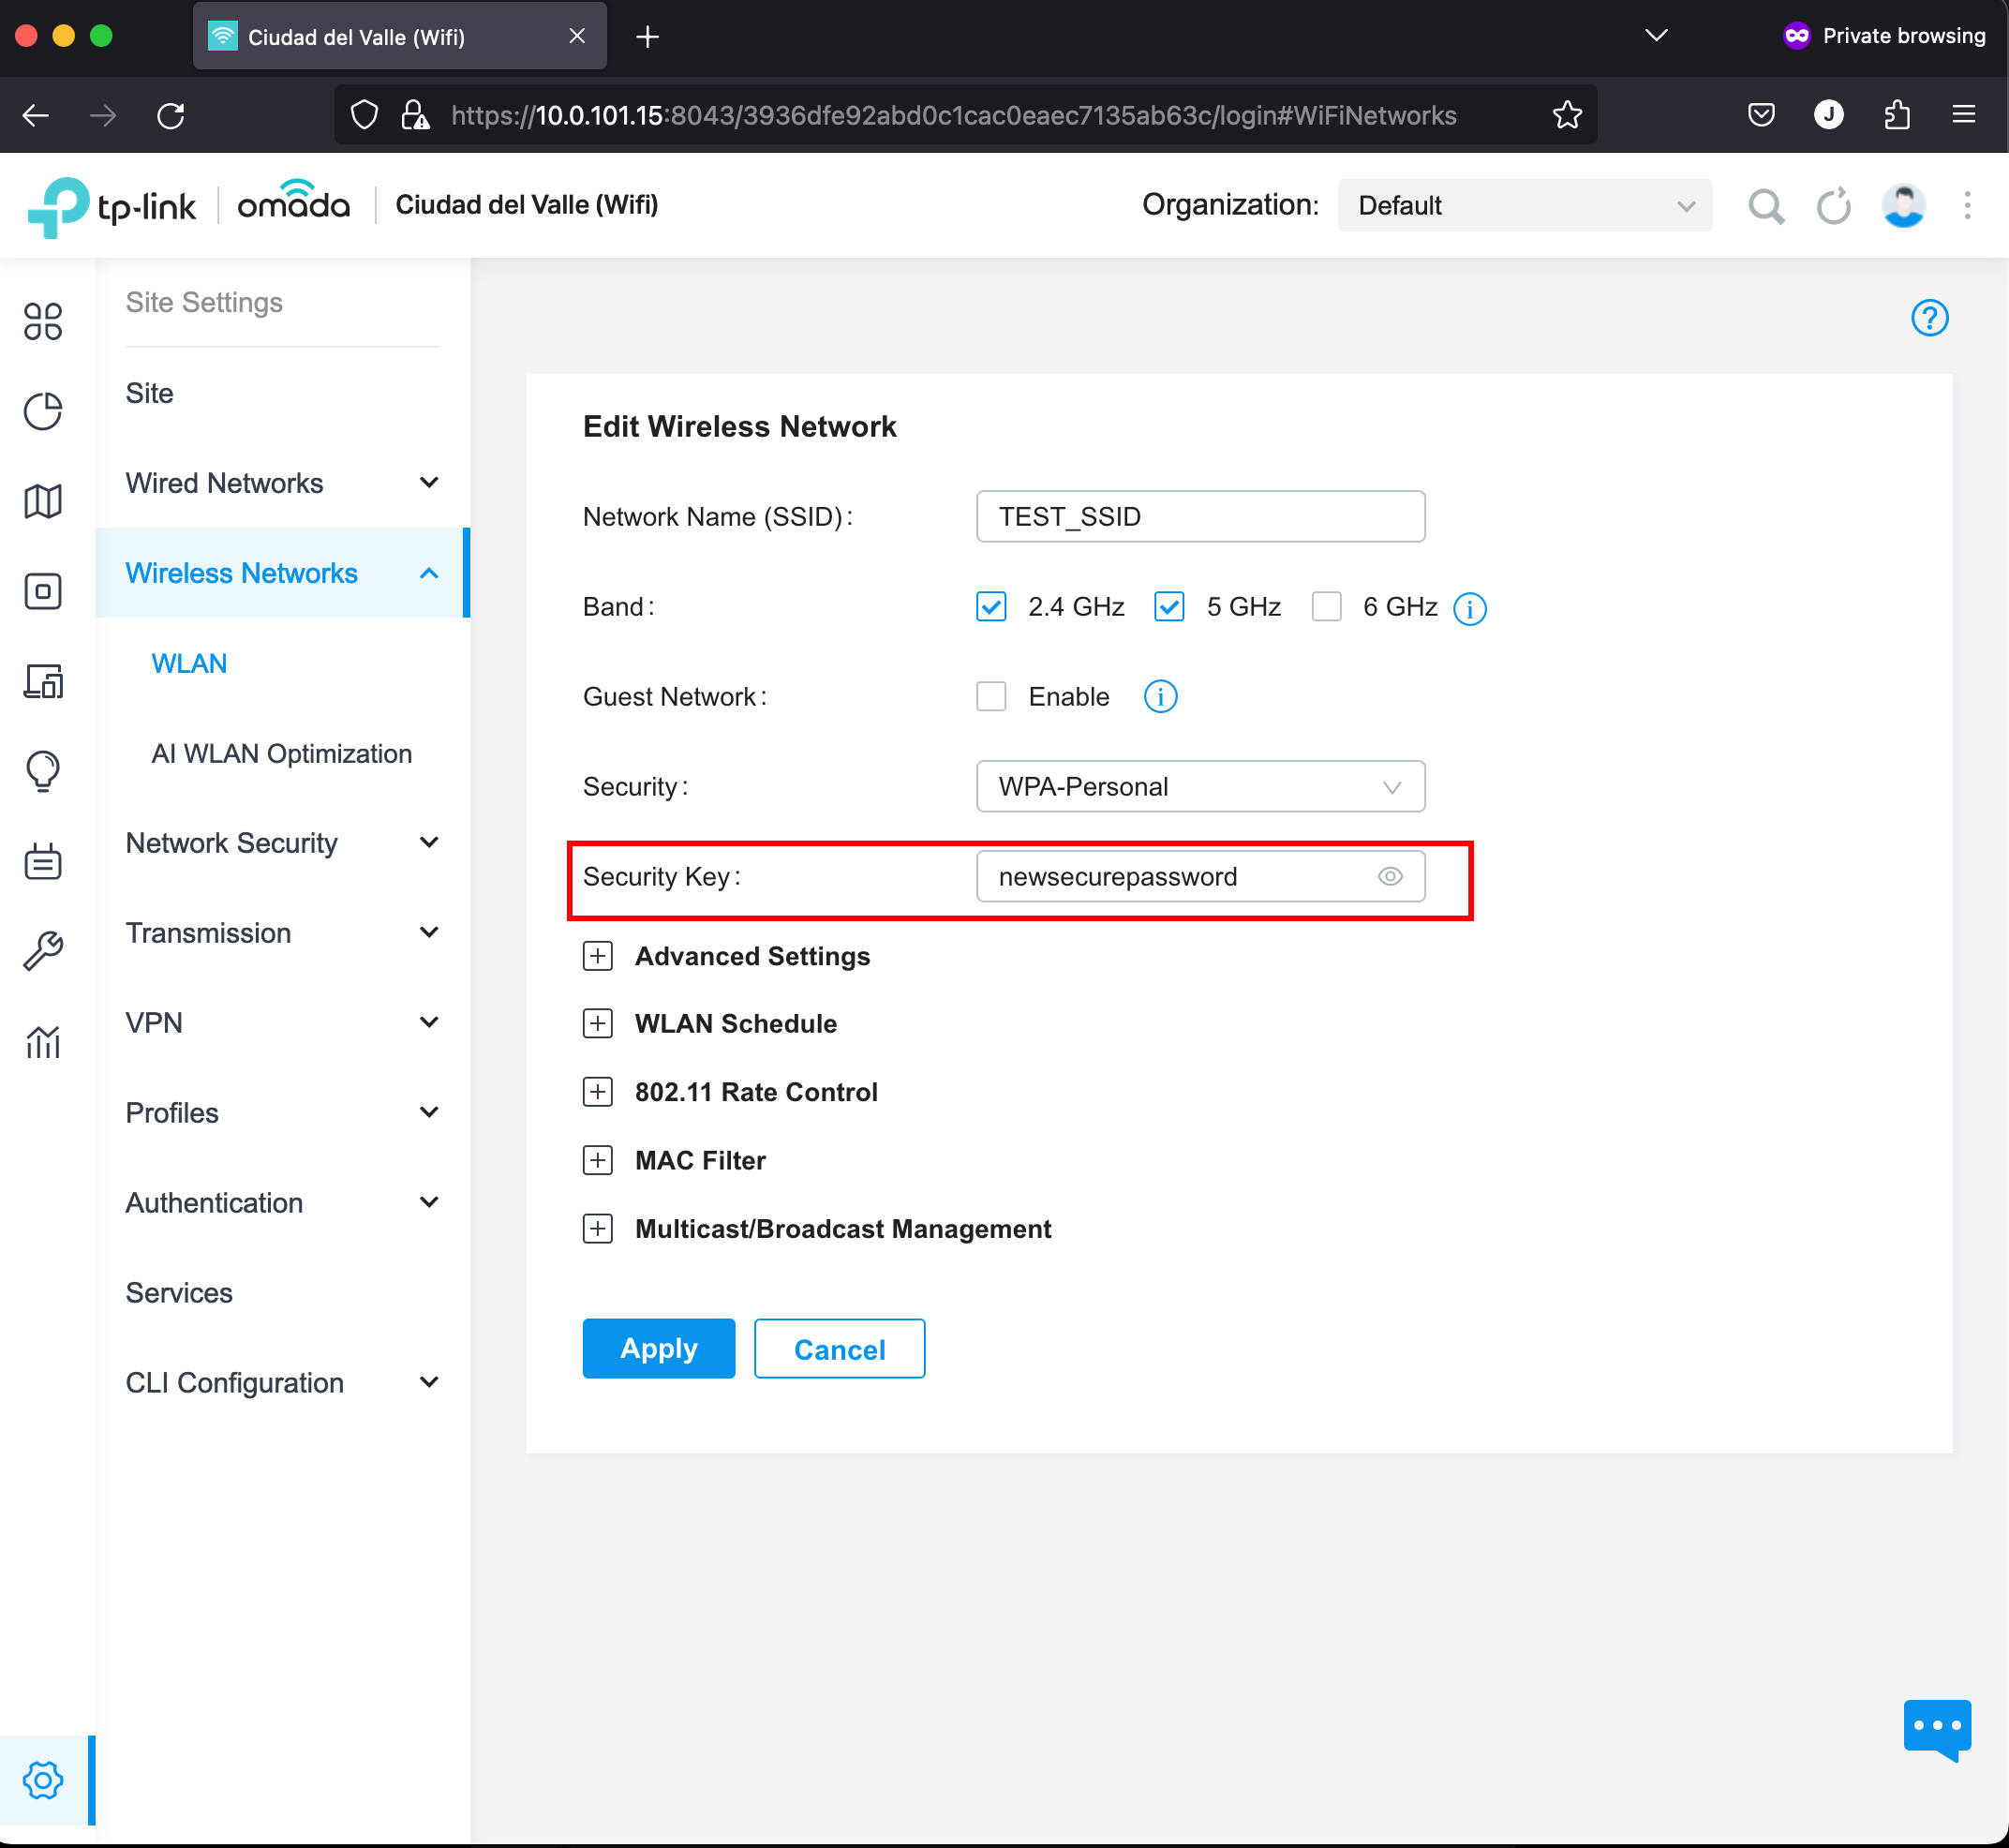
Perfect! Our script worked. The next step could be adding it to a cron somewhere so that the guest password can be modified periodically. Good Luck!
